This tutorial will focus on recreating the signature sound of the original Nintendo Gameboy “gray brick”, though the sound of other hardware can be mimicked as well. Using vintage hardware to compose Chiptune music can be expensive and tedious, which is where the features of the Resampler come in handy. The sample format of the Wave channel of the Gameboy, according to the Little Sound DJ user manual, is 4 bits, 11.468 kHz. This channel is used for creating arbitrary waveforms (those other than pulses). Recreating this is a perfect task for the Resampler. If you’re familiar with the Resampler you may decide to skip the rest of the tutorial, but beware that the 4 bit resolution is for a normalized waveform, to mimic this resolution we will have to use more bits or normalize the signal.
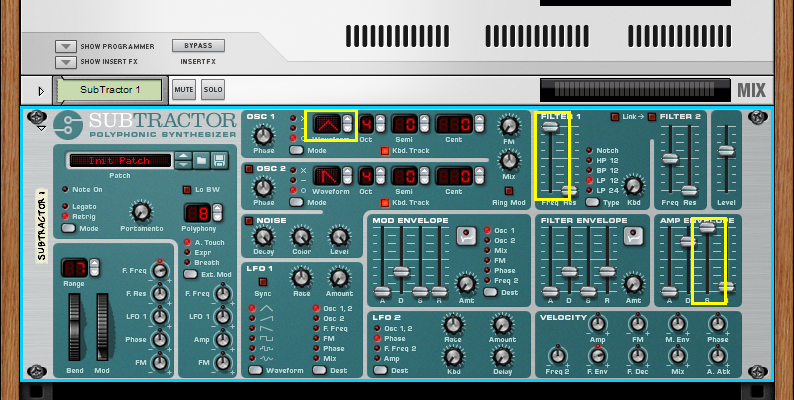
So let’s get started. An easy way to hear the effect is to use a simple triangle wave. We start with a Subtractor synthesizer, reset the device using the right click menu to get the initial patch, and change the OSC 1 to a triangle wave. Turn both the Filter 1 frequency, and the amp envelope sustain all the way up to get an unfiltered waveform with steady volume.

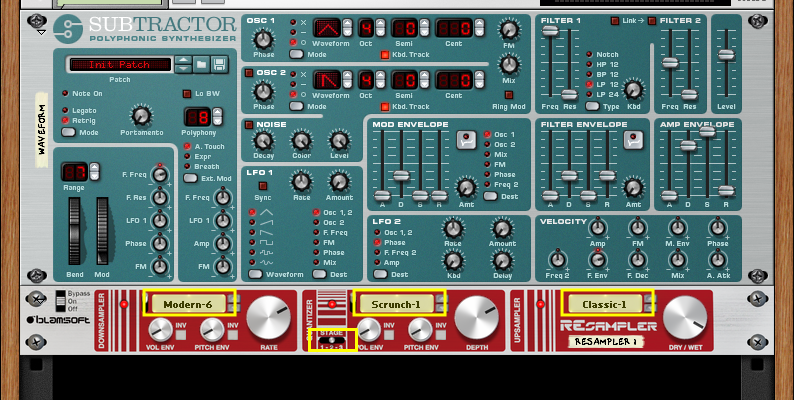
Now add the Resampler as an effect on the Subtractor. An easy way to do this is to right click on the Subtractor and choose the Blamsoft Resampler from the Creative Effects menu.
On real hardware there would be no resampling since the samples are stored in ROM tables in the cartridges. Recreating this in software requires transparent downsampling. Choose Modern-6 in the downsampler for high quality downsampling. For emulation of a DAC at the slow sample rate, choose Classic-1 in the upsampler. For the quantizer, simply leave it at Scrunch-1, this is the most basic quantization that simulates the 4-bit DAC accuracy. Leave the Stage switch at 2 so that quantization happens between downsampling and upsampling.

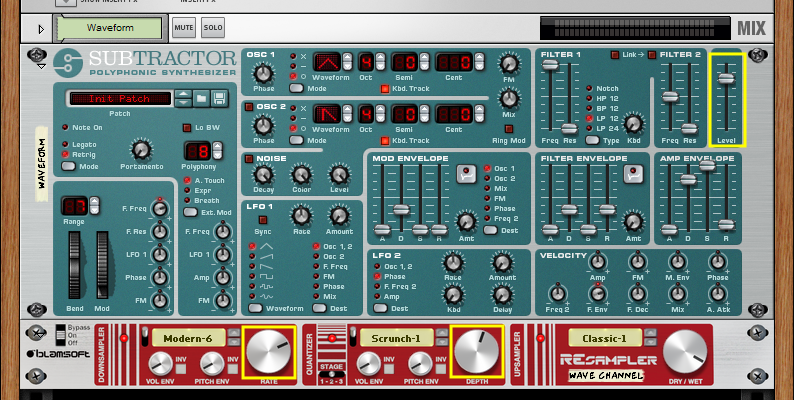
The last step in recreating the accuracy of the Gameboy sound chip is to adjust the rate and depth knobs. The rate knob should be close to 11.468 kHz, it can be set to 11364 Hz by holding the shift key when adjusting the knob. The Depth knob is trickier. Ideally, the setting would just be 4 bits. But since the signal coming out of the Subtractor is not normalized, the value is set higher to get the same effective quantization. This can be adjusted to taste depending on the volume of the Subtractor. With the Subtractor at 100, 7.5 bits sounds pretty good. To get a more precise setting, it is possible to calculate the required depth. Since the meter shows -20 dB, the equation log2(2^desired_bits/10^(measured_db/20)) gives a result of 7.3 bits.

Now you have a Gameboy sound chip emulator. You’re invited to leave comments or enhancements in the section below.

Try downloading the Reason song file at the top of the page. You can see how the sound clip was made.
Is there, or will there be a manual available? I’m looking for descriptions of the algorithms.
Typo: “Scruch-1” should be “Scrunch-1”
I couldn’t get the rate to 11346, but only 11364. Is that a typo as well?
Thanks for reporting the typos.